It's no secret I love stamping. Cheaper than nail polish strips or decals and easier than freehand, they are a simple way to get really complex looking nail art. But just what is stamping? What do you need and how do you do it? Well I'll do my best to go step by step and show you just how to stamp your nails.
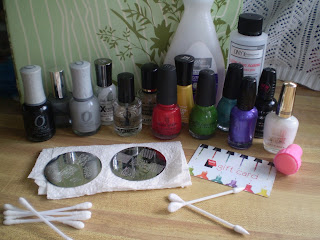
What do you need? Don't freak out by the amount of polish in this picture. It was a photo of all the polishes I used for my Can't Rain All The Time mani. You only need a few polishes for stamping. A base color (if you want one) and a stamping color. What polishes will stamp? Nearly any polish that will paint your nails in just one coat would make a good polish. Heavily pigmented creams are usually used, but some holographics do as well. Experiment! One trick I like to use is to mark a piece of paper with a pen then paint over the mark. If you can still see the mark thru the polish, it prolly won't stamp well. There are some polishes out there that are created special for stamping (thick and highly pigmented), and I hear they work great, but they tend to be rather expensive.
First, prep your nails. I'm setting up my Thunderstorm nails here, so we'll just use this picture. Make sure the polish is dry before trying to stamp, or you're just gonna smear it.

Next up, the plates. Where do you get them? Well there are a few stores out there that have started carring them, but the best place so far is still online. BundleMonster.com and Cheeky Beauty.com are two of my favorites, but there are many more out there yet. Most plates out there have a thin plastic film covering the plates. You need to remove that before trying to use the plates. The film used to be clear, but so many people forgot it was there or simply didn't know that most places make it blue now so it's harder to miss.
Choose the image you want to use and put your chosen polish on it. You can cover the image, but I find once you get used to stamping that that is a waste of paint. Instead just put a line at the top of the image and when you scrape it away you will be scraping the line down into the rest of the image.
You can use scrapers made for stamping, but I have yet to find a scraper I like. Instead I use an old gift card and it works like a dream. hold the short end against the plate at about a 45 degree angle and pull it towards you. The idea is to scrape the polish off the plate and just leaving some behind that has settled into the etched design. If you are trying to use a design that has large etched areas or big bold lines, use very gentle pressure to scrap that. If you scrape too hard you might scrape it out of the etched areas. Thinner lines, like these clouds, you can be a bit more firm with.
You can see the excess polish scraped off the plate. Oh, use a paper towel under the plate or that excess will now be on your table. You can even see the black polish settled into the etched clouds on the plate. It's at this point that you are going to need to work quickly. The polish in the plate is a very thin layer and will dry if left on it's own.
So press your stamper onto the plate. You need to apply firm pressure, but if you smash the stamper into the plate you could squish the polish out of the plate. Firm, but don't "Hulk, Smash!" it.
You can now see the design on the stamper. On the plate in the background you can see that the image is no longer black with paint. That's because it is now on the stamper. I couldn't get a picture of the next step because I only have two hands. I need a third to hold the camera, but just press the stamper onto your nail. I like to use a rolling motion and roll the image onto your nail, but if the image has a lot of parallel lines, straight up and down might be best for ya.
The stamp is just a little bit bigger than my nail, but that is ok. Too big is way better than too small. A little bit of remover on a cotton swab will clean up the mess in no time at all.
Lacquer or Leave Her has a wonderful post on Stamping Tips and Tricks you might want to check out as well!


No comments:
Post a Comment