Showing posts with label Product Review. Show all posts

Monday, November 1, 2021

Pueen Stamping Kit #1: The Pink Box


Look what I found at my local Wal-Mart! Now I know they have carried this kit for a while, but this is the first time I've picked one up. I'm familiar with the brand Pueen (even if I can't pronounce it. Does it rhyme with queen?) and I've always thought of them as a reputable company. I'm so stunned to see something as niche as nail stamping in a Wal-Mart! Can this make stamping go more "mainstream"? Anyway, this is the pink box, I believe there is also a blue box version as well as a few individual plates. (UPDATE: I got the Blue box and 2 individual plates so I will do a review on them as well. It also looks like there is another pink box called watermarbling. I might have to hunt that one down.)


Check out all that comes in the box and how well it works after the break!

Monday, July 8, 2019

Holographic Pigment Powder


Holographic powder isn't exactly new. Spectacular? Yes. New? Not really. SpectraFlair has been a popular polish additive for years. the difference now is how its used. The holo of old was added to existing polish to give it a holo sheen but balancing the ratio could be difficult. Too little and you see no effect. Too much and you end up with grey sludge. The new powders in holo, chrome, and multi chrome that have recently exploded into popularity are buffed into the nail after it is polished. The coverage is surprisingly complete and I believe it uses significantly less of the precious powders.


One of the first pigments available in brick and mortar stores. I got this at Sally's Beauty Supply a few years ago. (yeah this review has been sitting in my queue for years.) SuperNail came out with Chrome, Rose Gold and Holographic. Of course I had to go with Holo. It was also a great time to use my Seche Vite UV lamp I got on clearance years before but never had polish to go with it. Pigment powders work best with a UV/LED No Wipe Top Coat.


Its really very easy to use. Just paint with the top coat, cure it under a light, use the eyeshadow applicator to pick up just the tiniest bit of powder, and buff it into your cured polish. That's it. All there is to it.


Literally this is all the powder you need for one nail.


This is Layla holo nail polish (with a little stamping for flair). I've yet to find a regular top coat that doesn't "eat" the holo effect so this is not top coated and wears away at the tip.


More Layla polish with no topcoat. Ring was with Black Holo, others with regular Holo.


Holo powder buffed into the nail with another coat of No Wipe on top of it so that it shines too! Index and ring have a coat of black under the top coat, the others are naked.  I'm in love with powders and now have a large collection of tiny pots of powder.

Kiss Nail Dress Stickers


Full transparency here: I've never been a fan of finger stickers. They may seem like such time savers and there are some fantastic designs out there, but the actual techniques, the logistics of it, I don't like. But I was willing to give it a shot. Maybe I was wrong about them. Spoiler warning: I wasn't.


So I've always been under the impression that nail polish strips were actual nail polish, painted thin so you can peel it up and put it on your nail. These arn't. They don't smell like polish and are actually thick and strong. They make me think of vinyl. They do give you alot of sizes and tips. If you're careful you can get a few manicures out of one package. If you just do accent nails, a lot more than that.


My biggest issue with them was the end that you file off the excess. It leaves a jagged edge that picks up fuzz and fur constantly. With my nails in particular, I have a decent C curve (the arch of the nail side to side) but I also have a Transverse Curve (a curve of the nail from cuticle to tip). Both of these curves means nearly all the full nail sized sticker I use wrinkles. I just don't have the skill to make it lay flat.


Jagged tips after just a day or two. The adhesive is very good and the stickers stayed on thru showers and hand washing, but they still just don't impress me.

Friday, April 11, 2014

China Glaze Water Marbling Kit.


I wasn't planning on doing another water marble post so soon after that last one, but at Sally's Beauty Supply yesterday I came across marbling kits that I was very excited to try! China Glaze polishes are 5.99 with a Sally's card and the kit is 13.99. In the kit is 4 polishes, a plastic cup and a small orange stick. So it was way cheaper to purchase the kit than to get the polishes individually. Twirlin' and Swirlin' (pictured above) comes with the polishes "That's Shore Bright" "Pink Plumeria" "Snow" and "Too Yacht To Handle". There is a second set that I didn't purchase called Spin Me Round. I already owned "Celtic Sun" and just got "Snow" in the other kit, so I just bought the 2 other colors "Turned up Turquoise" and "I'm With The Lifeguard" to finish that set. Nouveau Cheap just did a post on both kits as well.


First up the cup that comes with the set is considerably smaller than the cup I'm used to using. Now I thought right away that it was useless and I'd never end up using it, but it is actually pretty nice. I'd never used something so small, and with smaller cups you can get more intricate designs.


Like all marbles, first up you paint your nails white and tape up the finger. Add the polishes to the water, swirl em around, and dip in your finger. For better directions check out my water marbling post here.


See? With the smaller cup you can get more design to show up on the nail easier. Cleaning the surface of the water was easier as well.


And here is the finished product. I only did on finger to test it. After this success I decided to do a whole hand using the polishes that come in the other kit Spin Me Round. "Turned Up Turquoise" gave me fits, but otherwise all the polishes work very well for marbling. I am impressed!


Sunday, March 23, 2014

My First Foils


I have always admired nail foils. So shiny! And a fascinating effect that glitter and holos just can't quite copy. I did get some by Fingr's Heart 2 Art collection, but it didn't come with glue. Fingr's directions was to paint your nails and just before it was completely dry to put the foil on then. That seemed incredibly stupid so I just hung onto the foils until I got some glue. I figured it was just a matter of time before I did. A couple weeks ago I proved myself right when I found It's So Easy Foil 'Em Kit. 3 rolls of foil and a small bottle of glue!


My camera didn't want to pick up the patterns in the foil at all. The rolls in the box are, from the left, silver with holo lines running thru it, aqua blue with holo dots, and violet with holo dots.


The directions are more what I expect from a foil kit. Paint your nails with the glue. As it dries it turns from milky lavender to clear. The interesting thing with foil glue is it dries sticky.


Here you see the light purple color of the glue on my thumb. The ring finger is almost dried so you can see how much clearer it is.


I tried to keep the foil on the roll but it was unwieldy so I cut a small square off of it. Press the boring color side of the foil to the clear, dry glued nails. Rub it onto the nail and keep it as flat as you can to avoid wrinkles. Then gently lift it off the nail. You will see the colorful part of the foil stick to your nail leaving clear plastic in your hands. You can see on my ring finger that some glue got on the skin and the foil transferred to it too.


 I've always been told not to topcoat foils. Curious I just had to give it a shot. The topcoat I used (Pure Ice "Girl On The Run") looked like it ate the shiny holo bits and made it look over all kinda foggy. I took a pic then redid the nail. So don't topcoat your foils!

China Glaze "Coconut Kiss"
 You can always go back and fix any bald spots on your nails. I still need practice, but for my first time foiling I am super proud of it!

Tuesday, March 11, 2014

Nail Polish Lexicon ~ Indie and Messy Mansion Product Review


I just got my first order of Messy Mansion plates. They are my first "indie" plates, plates designed and sold by an independent manufacturer. Commercial plates like Bundle Monster and MoYou are awesome, but ever once in a while I like to support those people that go at it alone. It is like the difference between a grocery store and a farmer's market. Indie plate makers are having a hard time of it lately. Some commercial makers have been trying to copyright the act of nail stamping and are attacking indie makers with lawsuits and cease and desist orders. You won't see me buying plates from people who do that anytime soon. And there there is the opposite side of the scale, the cut rate dealers. I don't mind super cheap plates of suspicious quality, but when they steal the designs from other makers it becomes not cool. So independent plate makers have the big commercial companies trying to force them out of business, and cheap companies stealing their designs.

Anyway, here is my first indie purchase. The 3 plates come in resealable baggies with a holographic sticker on the bag sporting Messy Mansion's logo "MM". I bought MM04 the Irish plate, MM25 the Science plate, and MM28 Crime.


The logo sticker really caught the light in this photo :)


Well first lets take a look at the size of the plates. They come with the standard blue film to protect from scratches. And they are larger than many of the plates I've gotten in the past. Here I compare it to BundleMonster's BM221. BundleMonster is a standard sized plates. Most plates you buy come in this size.


The area within the full nail image is also larger than BundleMonster's.


Much longer and a tad bit wider than BundleMonster. The size for full nail images do vary quite a bit. I'm just using BundleMonster because it is a very common plate company. And the plate happened to be sitting on my desk when my MM shipment came in.

And on to the stamping. The images are etched evenly and deeply. I think they are deeper than any plate I've gotten before. The edges are crisp and clean. I am in love! I've ordered 5 more plates and can't wait till they come in!


I am totally in love. By the way, what do you think of my new camera. I'm still working on the best way to use it, but I think the results are stunning. The shape of the photo is different and I'm trying to come up with a way to fix that without having to crop each and every photo, but other than that, I am super pleased.

Thursday, February 13, 2014

Kiss Stamping Nail Art Kit (Soft Stamping)


I just found this at my local Wal-greens! I have heard of "soft plate" stamping, but had never seen it before. It is an interesting take on the nail stamping technique. There is no metal plate, instead the etchings are right on the stampers. I decided to give it a try and see if it works as well as its metal plate counterparts.


Here is a shot of every thing that comes in the kit. The stamping head holder, 3 etched stamping heads, a small bottle of white polish and directions in several languages.

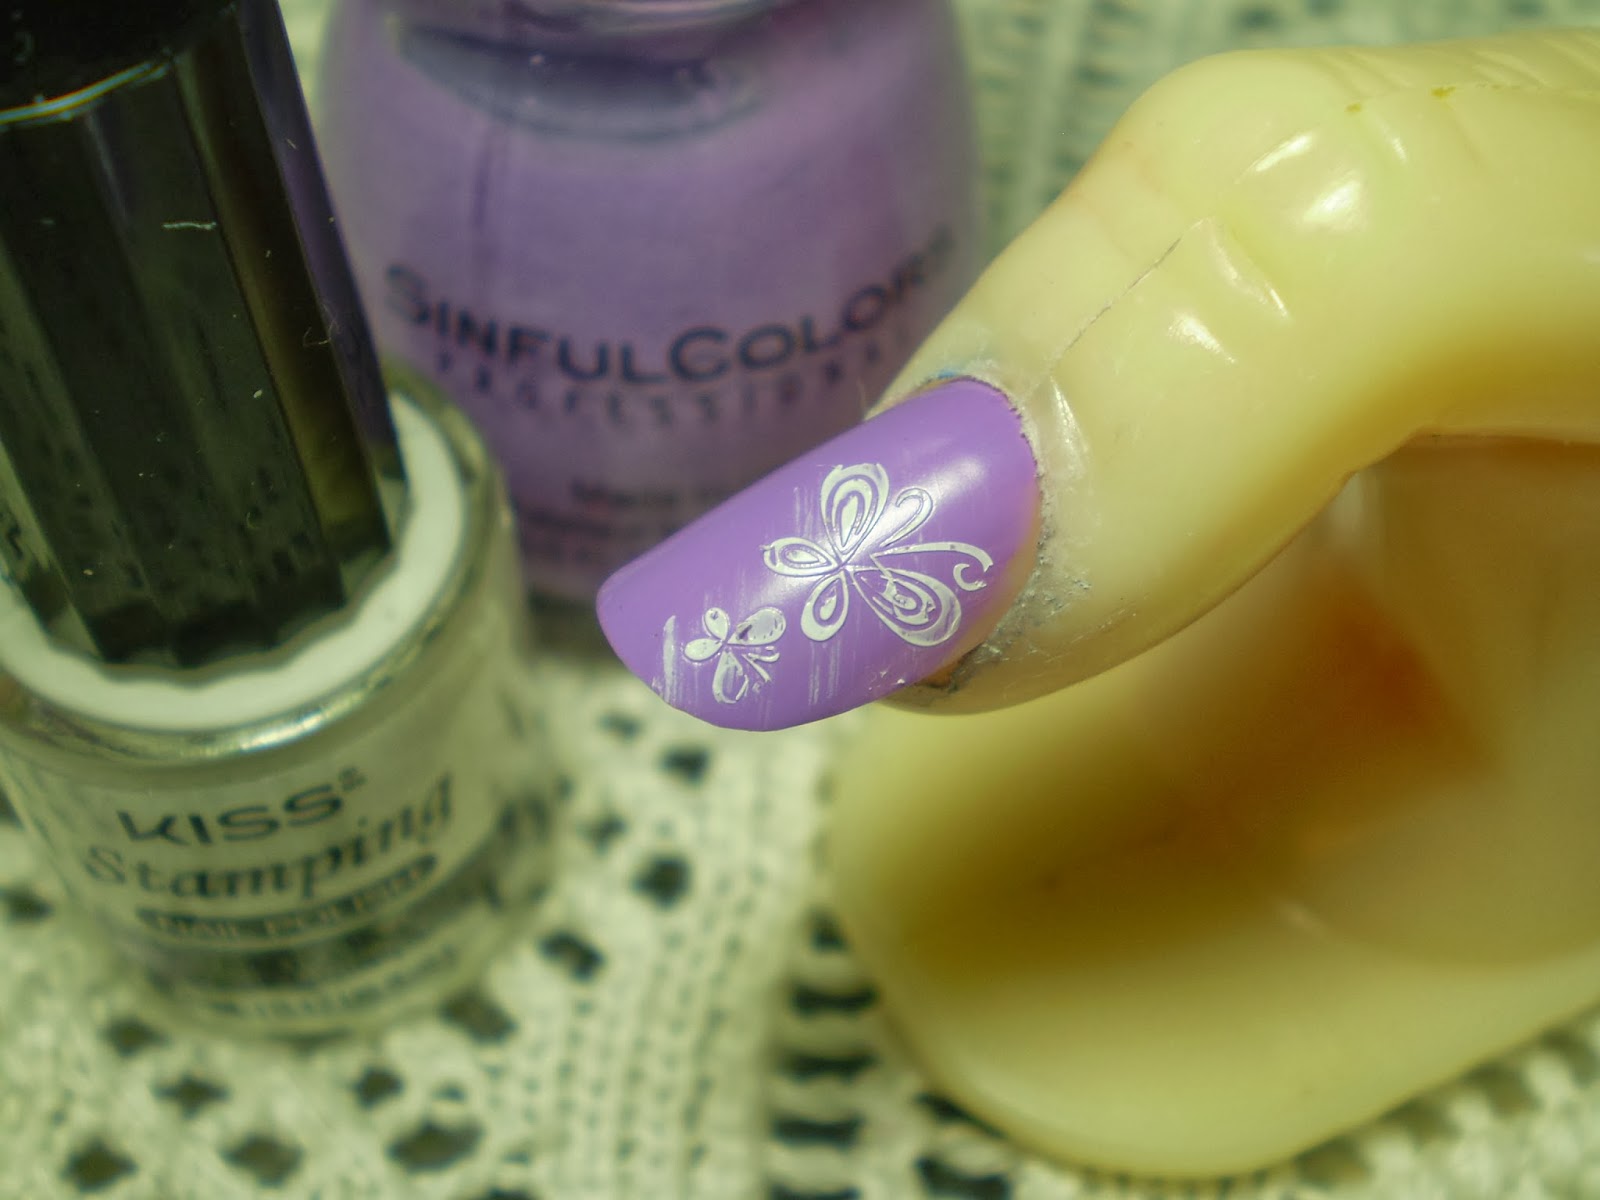
Sinful Colors "Tempest"

My very first attempt and I'm rather impressed by it. The idea is, you fit the stamping head you want to use into the holder. Then paint over the image you want to use. Rub the stamper over a paper towel to remove the excess leaving paint only in the etched areas and press it onto your nail. You can see I have a little streaky-ness still on the nail from where I didn't get all the excess off. I figured I just needed practice.

Sinful Colors "Pastiche"

This one turned out well, but I think I rubbed a bit too hard. Some of the stamp came off when I rubbed.

Sinful Colors "Endless Blue"

This one I know I rubbed too hard. I lost most of the detail of the flower. That and the blue wasn't dry all the way and smudged a bit.

Wet n Wild "Black Creme"

And finally I used the full nail image. After rubbing too hard the last too times, I don't think I rubbed hard enough here. I got a lot of fog in the image. I was pleasantly surprised by the polish that came with the kit. As a beginner polish, it really is quite nice.  Overall, while this is a nice set and decent for beginners, I don't think I would recommend it as anything other than a novelty. I can see many drawbacks to stamper heads as opposed to stamping plates. One, the stamper head size must be standardized or else each brand would have to sell holders just for their heads. With stamping plates, any stamper can be used on any brand plate. Two, storage might seem like a minor issue, but when I think of the number of plates I have, and try and convert that number into stamper heads...well that would take up tons of space. Three, what about the girls with really long nails? Most metal plate makers make XL series for big images, but a stamper head image is restricted by the size of the stamper. Unless you made bigger stamper heads, but then you would need to make bigger stamper head holders. And the last reason I can think that it's not as feasible as metal plates off the top of my head, how do you care for the heads? I know that many stampers will break down after repeated exposure to acetone and nail polish remover. Will etched stamper heads break down too?

Bottom line? Fun and novel, but you won't see me switching from my metal plates anytime soon.

Saturday, February 1, 2014

Wal-Mart's Stamping Kit


I knew that Fing'rs had a new stamping set come out with their Heart 2 Art collection last summer but I never got a hold of it. Wandering about Wal-mart last week and lookie what I found! I can't tell for sure yet, but it looks like this set might be getting added to their everyday collection. My Wal-mart is still in the process of setting up the polish wall, but it would be awesome if they carried this all the time! Here is a close up of what comes inside.


For almost 7 dollars you get 2 plates, stamper, scraper, and a tiny bottle of white polish. I didn't care much for the polish, but for a beginner it's fine. I just really prefer my Cosmetic Arts white "Picture Day" right now.


The plates are very nice and this time don't seem to be dupes of any other plate. I whole-heartedly encourage them to come out with original images. All the other plates Fing'rs has come out with have been copies of other plate makers. Interesting thing tho, these plates had no plastic covering on them. Then again, they didn't seem to need it. There were no scratches in the plates at all. They were well etched and rather detailed. The only real problems I've been having is with the "Lucky" image on the right hand plate. Not all the dots in the background want to show up, but I'm gonna keep trying. I have plans for that one for St. Patrick's Day.


Very few white polishes stamp so I wasn't surprised that this white wasn't all that opaque. You can get a stamp from it, it's just not that white. The stamper and scraper I was very pleased with. This is the first scraper I've gotten that I don't mind using. I still prefer my gift card scraper, but this is a very good second best. And the stamper? I love it too! It's about a standard small size, but squishier than all my others. Softer too. Not marshmallow soft like some of the really good expensive stampers, but still nicer than any of my other ones so far.

Over all I am super happy with this set! I recommend it for anyone wanting to learn how to stamp. If you are already comfortable with stamping, just looking for better tools, these are nice, but there are better ones online. For those with epic stamping skills and tools, I wouldn't bother with this set unless you really fall in love with the plates. 7 bucks isn't a bad price for a couple plates and who doesn't need back up stamper and scraper?

Wednesday, November 20, 2013

Fake Nail Polish

Great, just when I get in the mood for polishing and posting, I get sick. What did I do to make the universe so unhappy with me :( Well, since another Doctor Who mani has to be postponed I wrote up a review on some makeup I bought for Halloween this year.


Zombie Nail Polish & Lipstick

Picked this up for Halloween and just now got around to playing with it. I don't have much when it comes to greys so even though I bought this for the lipstick that it came with, I was excited to have a new grey. It is made by Fun World, a Halloween costume/makeup company. It was very cheap, I think we only paid a buck or two for it. Good thing too, this was a disaster beginning to end. The packaging is very attractive and shows a model sporting shiny grey tips. Yeah, right.


The lipstick was fine, rather sheer but fine. I didn't use it on myself tho, I used it for dad's face make up for Nightmare on Chicago Street. Today, however, I need to talk about the polish. Despite what it says on the package, this is NOT nail polish. I don't know what to classify it as. I think its closer to acrylic paint than any thing else. First, when I opened the bottle it has nearly no scent. That is HIGHLY unusual for nail polish. Then when I painted it on a practice nail it beaded up and didn't want to adhere to the plastic nail at all. Then when it did dry it cracked and flaked off, just like paint on plastic would.


2 coats and it still didn't want to cover the nail. This polish is a HUGE fail. I'm glad I got some use out of the lipstick or this would have been a complete waste of money. For the sake of science I'll swatch it on my own nails, but I have no hopes for this "polish" and I strongly recommend against it.

Friday, October 11, 2013

MoYou Review


I am totally and completely in love. I want every single plate MoYou has ever made. I touched on it last month during the 31 day challenge, but now that the challenge is over I get to show you my first pretties I got from them. I placed my order for 2 plates at the end of September and will place a larger order in November (gotta save my pennies up). Back in Sept there was only one "mural" style plate and I had to have it! Now there are 21 to date. What do I mean by mural style? So glad you asked!

This is what a regular stamping plate usually looks like. Squares of images laid out in a grid on the plate.


This is the "Back to the 80's 02" plate by MoYou. Some size comparisons to BundleMonster 300's set. As you can see these are smaller than BundleMonster full size images. Just after I got these plates they came out with "Extra Large" images, but I don't have any of them yet.


That was the standard layout for a stamping plate. The mural style plates are like individual artworks all by themselves. This was the first mural they made called "Suki Collection 01".


I was simply blown away by the beauty of it! Just look at all the detail in there!


As much as I love them, I would caution new stampers to gain some experience, especially in isolating images before tackling them. Then can be intimidating to a new stamper. If you're an old hand at it, I highly recommend them.

These pictures make them look very large, but I was surprised that they were much smaller. They are about the size of 2 round plates side by side.

               
Instead of the standard paper backing to keep from cutting yourself on the plates, they have a thicker plastic backing that is just slightly larger than the plate so it looks like its framing it.

I know, you want to see some manicures done with it. I'm working on it, but here is the picture from Day 10 of the challenge last month.


And me just playing around with my new toys. I was super excited and didn't take the time to place some of the stamps properly so some are off center. I'll be better next time.


I'm losing my mind over these plates. I've compiled my wishlist, just waiting for November to place my order.