Monday, April 7, 2014

Spring Watermarble ~ Flora Glow


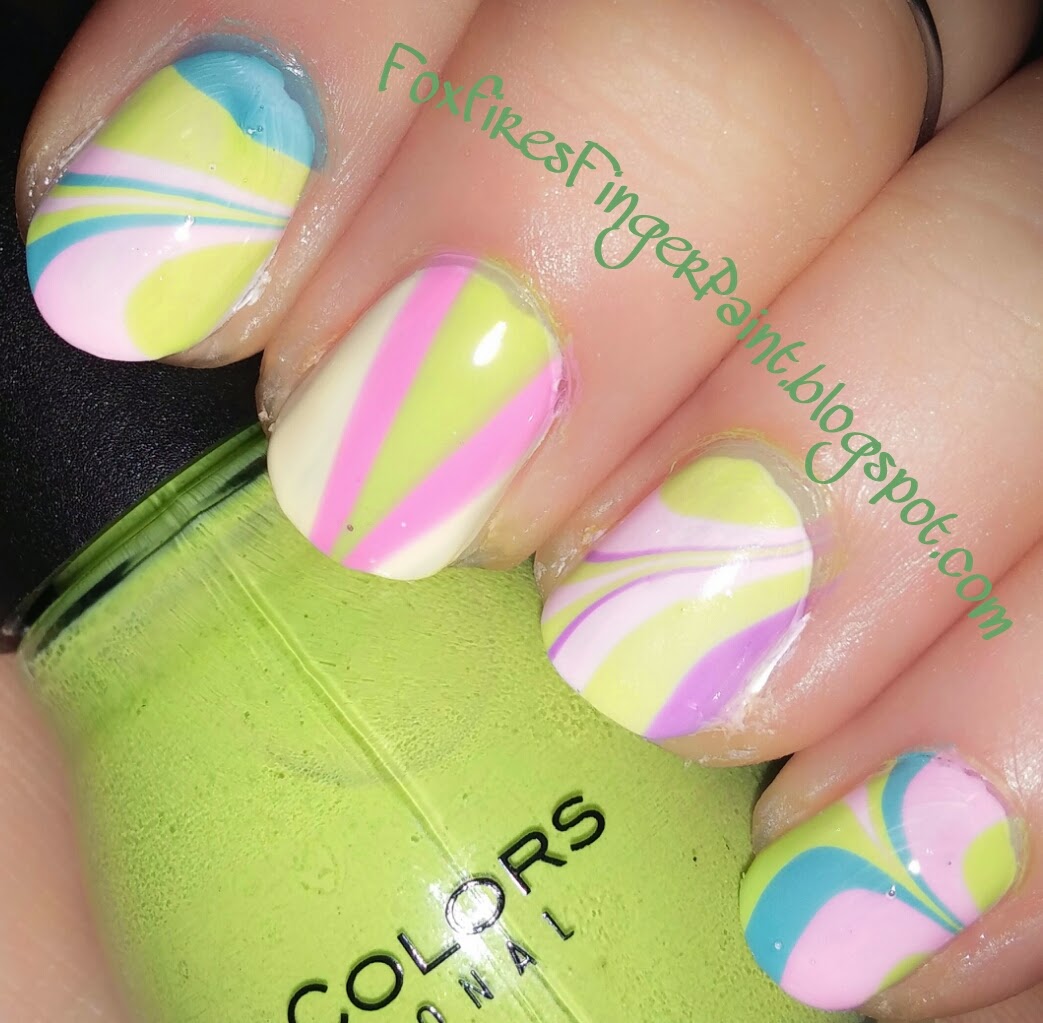
A new month, a new challenge from my nail art group World of Nailcraft! This month is was the palette "Flora Glow". Lovely soft pinks, teals and greens and at least one nail had to be watermarbled. You all know my love and fascination with watermarbles, so I had to get on this right away!  I put a base down of white and used all Sinful Colors for the marble. "Cotton Candy", "Unicorn", "Pistache", "Sweet Nothing", and "Tempest". Here is the image we were given as inspiration:


I wish I had more of the teal like blues, but I think I rather nailed the pinks and light yellow. The blue, purple, and green I added because it complemented the other 2 colors and I didn't want just a pink and yellow marble.

Sunday, April 6, 2014

Dragonscales


I am so in love with these nails! The mottled look of the scales is stunning! On Messy Mansion's facebook page a fan posted dragonscale nails and I fell in love with them I just had to try them myself. I don't see a blog post from her but I will link to the facebook post here. I don't know what polishes Jae K used, but I painted my nails first with 2 coats of Sinful Colors "Clementine" I then sponged a little bit of Sally Hansen "Lighting" in patches. Where I didn't put "Lighting" is sponged just a teeny tiny amount of Essie "Fifth Avenue". Then I sponged all over it again with "Clementine" to blend all the edges. I went over the top of the red and yellow to make them not so bold. This way it all looked like shades of orange.


Satisfied with the base colors, I then stamped over it with MM21. Scales on all fingers, but a dragon for the accent nail. I used Cosmetic Arts "TGIF". To give you an idea of how big the stamps are, here is my nails before clean up:


More than satisfactory for my nail length.

Here is Jae's picture:


And mine again:


One of my better Monkey See, Monkey Do mani's if I do say so myself.

Friday, April 4, 2014

Koi Fish.


I almost named this post "Jelly Fish" for no other reason than it made me giggle. After my fail of a seahorse, I still wanted to try making an image go across all my nails. Other than a little mess up on the middle finger (it's a bit twisted) I really like it! I painted my nails white (when my bottles of white get low I pour them all into one bottle, so this is a mixture of Sally Hansen "White On", Wet n Wild "French White Creme" and Milani "White On The Spot") I then stamped with Cosmetic Arts "TGIF" using Messy Mansion plate MM29. I colored in the Koi using OPI "Y'all Come Back Ya Hear?" making sure to leave uncolored white patches. Then I filled in the water with a frankened blue jelly I made. I love this so much more than my seahorse from the other day!

And here is the Koi fish for comparison in-case you're not sure what a real one looks like.


Tuesday, April 1, 2014

April Fools Again!

April Fools is here, so it's time for another "manicures that made a fool out of me". Now, there isn't too many this year, not because I didn't screw up any, but because I mostly stopped taking pictures of manis that didn't turn out right. Here is one that happened just recently. I had just got some new Messy Mansion plates and pulled out my jellys. I had to make a blue for the water because I don't own a blue jelly. I then made the poor decision to color in the seahorse with pink. It just isn't an attractive color combination. When stamping I didn't get all the unwanted parts of the image off the stamper so there is a blotch of white that I tried covering up with the jelly on my ring finger. I'm also outside the lines on the index. I'm just not happy with the over all design.


Next up is a glitter placement that looked a lot cooler in my head than it did on my nail. I just got carried away. It's not horrid, just not what I had in mind. I wanted a falling gold coin look, and all I got was a gold disco ball. One of my many green manis for St. Patrick's Day this year. I also had a massive problem with air bubbles again. I think I may have just used too much topcoat when I was trying to smooth out the glitter.


And of course if we are mentioning fails, my foil flop has to come up as well. I've since been told that only certain topcoats will work over foils with out destroying them. Topcoats I don't own...yet.


That's it for now. I'll have to remember to take pics of the manis that don't turn out well just for this post each year.

Tuesday, March 25, 2014

Police Nails


My Uncle just celebrated 30 years with the police force and will be retiring soon. I just got Messy Mansion's plate MM28. Coincidence? I think not. The universe is obviously telling me I need to do a crime and punishment mani so here it is. I rushed the stamping a bit because I was running late for work, but over all I like how it turned out! Index, middle and pinkie are all painted an unnamed grey from Fingr's and stamped over with BundleMonster's BM414 using Wet n Wild "Black Creme". I then used MM28 again and Cosmetic Arts "Picture Day" to add some fun images. Oh, the DNA strands are from MM25. The ring and thumb are Sally Hansen "Lighting" stamped with MM28 again in "Black Creme". I really do like it. The grey fingers remind me of fingerprint dust. Many people don't know this, but I started taking classes thinking I wanted to get into forensic science. That was the vague plan anyway. Then one semester I took a microbiology class as just a prerequisite and fell in love with micro. So Forensics fell to the back-burner as Micro took front stage, but it still holds a soft spot in my heart.


Sunday, March 23, 2014

Foiled by Foils


My Foils from yesterday that I was super crazy proud of? This is what they looked like today. I didn't get more than a few hours out of them. I need to find a way to protect the foil, but topcoat ate it. I'm not sure what I'm gonna do, but it's time to experiment.

My First Foils


I have always admired nail foils. So shiny! And a fascinating effect that glitter and holos just can't quite copy. I did get some by Fingr's Heart 2 Art collection, but it didn't come with glue. Fingr's directions was to paint your nails and just before it was completely dry to put the foil on then. That seemed incredibly stupid so I just hung onto the foils until I got some glue. I figured it was just a matter of time before I did. A couple weeks ago I proved myself right when I found It's So Easy Foil 'Em Kit. 3 rolls of foil and a small bottle of glue!


My camera didn't want to pick up the patterns in the foil at all. The rolls in the box are, from the left, silver with holo lines running thru it, aqua blue with holo dots, and violet with holo dots.


The directions are more what I expect from a foil kit. Paint your nails with the glue. As it dries it turns from milky lavender to clear. The interesting thing with foil glue is it dries sticky.


Here you see the light purple color of the glue on my thumb. The ring finger is almost dried so you can see how much clearer it is.


I tried to keep the foil on the roll but it was unwieldy so I cut a small square off of it. Press the boring color side of the foil to the clear, dry glued nails. Rub it onto the nail and keep it as flat as you can to avoid wrinkles. Then gently lift it off the nail. You will see the colorful part of the foil stick to your nail leaving clear plastic in your hands. You can see on my ring finger that some glue got on the skin and the foil transferred to it too.


 I've always been told not to topcoat foils. Curious I just had to give it a shot. The topcoat I used (Pure Ice "Girl On The Run") looked like it ate the shiny holo bits and made it look over all kinda foggy. I took a pic then redid the nail. So don't topcoat your foils!

China Glaze "Coconut Kiss"
 You can always go back and fix any bald spots on your nails. I still need practice, but for my first time foiling I am super proud of it!