Pages
▼
Monday, February 24, 2014
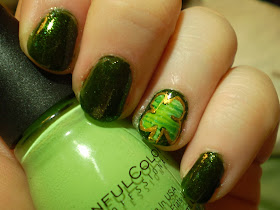
Fan Brush Shamrock
Another attempt at fan brush art. Better, but I'm still learning. I started out by painting all my fingers except my accent ring finger in Revlon "Rain Forest". The accent got a coat of white (Cosmetic Arts "Picture Day") before I added, in this order, Sinful Colors "Pistache","Envy","San Francisco", and "Innocent". Then I outlined the shape of the shamrock using "Rain Forest" and filled in the outside. I went over the outline again with Sinful Colors "Pot o Gold" striper polish. Not bad for a freehand attempt as well. I'm quite pleased with this!
Monday, February 17, 2014
Green Overload
So I pulled out all my green polish bottles to get ready for St. Patrick's Day and it occurred to me, I have A LOT of green polish. I mean, I know green is my favorite color, but it's startling to see it all laid out in front of you. So I posted this picture to my nail polish group to giggle over my collection.
And then I thought, could I somehow use ALL my greens in one mani? After dismissing several ideas on how to do that, I opted for simple lines. The original plan was lines on middle and ring and dark green or black on index and pinky, but I soon ran out of space on my nails and if I was gonna use all my greens I needed all my nails. The thumb is the only one that has repeat colors. I put down a basecoat of white so some of my paler greens would stand out better. Then with a detail brush I went to town! 2 hours and 31 polishes later:
I'm thinking of adding some gold stamping to it. Maybe shamrocks? Oh and I just did my left hand. By the time I finished my right hand it was 2 am and I was tired. Left hand just got a coat of Sally Hansen "Emerald City" and Chain Glaze "Running in Circles"
And for those of you who want to know what all the colors are, I'll put it behind the jump because there is a ton of them.
Sunday, February 16, 2014
Purple Roses
My Valentine's Day didn't go quite as planned. In fact it went quite wrong. But even tho it ended with me alone, a french silk pie, and season 2 of American Horror Story, my nails were still pretty! The white lace didn't come out very sharp, but I am super proud of the purple roses! The base purple is Sinful Colors "Tempest" and I stamped with "Enchanted over the top. I LOVE that combination! The rose stamp is from BundleMonster BM323 and the white lace is Cosmetic Arts "Picture Day" and a Fing'rs unnumbered plate. The lace may have been too much, but the purple roses are fabulous! Time to move on to my fav holiday of them all...St. Patrick's Day!!
Thursday, February 13, 2014
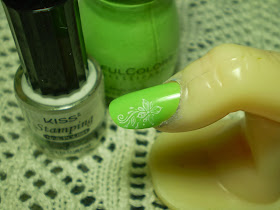
Kiss Stamping Nail Art Kit (Soft Stamping)
I just found this at my local Wal-greens! I have heard of "soft plate" stamping, but had never seen it before. It is an interesting take on the nail stamping technique. There is no metal plate, instead the etchings are right on the stampers. I decided to give it a try and see if it works as well as its metal plate counterparts.
Here is a shot of every thing that comes in the kit. The stamping head holder, 3 etched stamping heads, a small bottle of white polish and directions in several languages.
 |
| Sinful Colors "Tempest" |
My very first attempt and I'm rather impressed by it. The idea is, you fit the stamping head you want to use into the holder. Then paint over the image you want to use. Rub the stamper over a paper towel to remove the excess leaving paint only in the etched areas and press it onto your nail. You can see I have a little streaky-ness still on the nail from where I didn't get all the excess off. I figured I just needed practice.
 |
| Sinful Colors "Pastiche" |
This one turned out well, but I think I rubbed a bit too hard. Some of the stamp came off when I rubbed.
 |
| Sinful Colors "Endless Blue" |
This one I know I rubbed too hard. I lost most of the detail of the flower. That and the blue wasn't dry all the way and smudged a bit.
 |
| Wet n Wild "Black Creme" |
And finally I used the full nail image. After rubbing too hard the last too times, I don't think I rubbed hard enough here. I got a lot of fog in the image. I was pleasantly surprised by the polish that came with the kit. As a beginner polish, it really is quite nice. Overall, while this is a nice set and decent for beginners, I don't think I would recommend it as anything other than a novelty. I can see many drawbacks to stamper heads as opposed to stamping plates. One, the stamper head size must be standardized or else each brand would have to sell holders just for their heads. With stamping plates, any stamper can be used on any brand plate. Two, storage might seem like a minor issue, but when I think of the number of plates I have, and try and convert that number into stamper heads...well that would take up tons of space. Three, what about the girls with really long nails? Most metal plate makers make XL series for big images, but a stamper head image is restricted by the size of the stamper. Unless you made bigger stamper heads, but then you would need to make bigger stamper head holders. And the last reason I can think that it's not as feasible as metal plates off the top of my head, how do you care for the heads? I know that many stampers will break down after repeated exposure to acetone and nail polish remover. Will etched stamper heads break down too?
Bottom line? Fun and novel, but you won't see me switching from my metal plates anytime soon.
Wednesday, February 5, 2014
Purple Hummingbird
Another new month and my nail group World of Nailcraft has posted a new Monthly Pallet Project picture. Each month they post a picture and we have to do a mani based on the colors in the picture. Sometimes we even have to include certain elements, like stamping or dots or gradients. This month it was a Monkey See, Monkey Do meaning, using the colors of the pallet, we had to do a mani based off someone else's manicure.
This was the picture chosen for Febuary. Lukily I had already done a purple gradient hours before the picture was posted and was just trying to decide what to stamp over it. I chose Wacky Laki's Winter Hummingbird mani to mimic. Here's her mani :
Funny thing is we both used MoYou plates, but while she used the Pro collection, I used Suki 1 and Mother Nature 2.
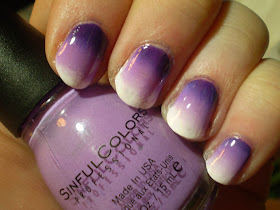
I took progress shots of my gradient because I thought of maybe writing a post on clean up, but I'm still not very good at that, so here is my messy fingers from the gradient.
Yeah, its a mess. Then here is the picture I was gonna use to write about clean up methods, but I'm still not very good at clean up, so I'll wait to write a post on that when I get better.
It may not be perfect, but it's the best clean up I've ever done and I'm super proud! The camera kept wanting to turn my purple into blue so I grabbed the bottle hoping to force the camera to realize how purple the polish is.
And another shot of the finished mani. The colors I used were Cosmetic Arts "Picture Day" Sinful Colors "Tempest" and "Enchanted". The stamping is MoYou Suki 1 for the blossoms and branches and Mother Nature 2 for the hummingbird. I used Cosmetic Arts "TGIF" for the stamping and added dots of Sally Hansen "Lighting" for the centers of the flowers.
Monday, February 3, 2014
Sherlock Wallpaper
The season finale just aired last night for Sherlock season 3 and wow! I really enjoyed it. Shame there is only 3 episodes a season. So here is my new Sherlock inspired nails. Not the best job, but fun none the less. Orly "Mirror Mirror" as the base with Cosmetic Arts "TGIF" as the stamp. I used Color Workshop's stamping plate. It was tricky, Color Workshop's stamps are narrow so I had to double stamp many of my fingers to get full coverage. I freehanded the smiley face in Sally Hansen "Lighting".
Oh, and for those that don't know, here is a pic of the wallpaper in question. In one episode Sherlock paints the face on the wall and shoots at it because he's bored.
Sunday, February 2, 2014
Love and Kisses
Getting some Valentine mani's lined up. Here was me playing with my new stamping kit by Fing'rs. I used 2 unnamed Ellen Tracy polishes, a blush pink for the base and a metallic pink for the stamping. I used one of the stamping plates from Fing'rs Heart 2 Art stamping plates, but unfortunately they don't number the plates. I then used a tiny sticker also from the Fing'rs Heart 2 Art collection called "Just Face It". Very simple and subtle.
Saturday, February 1, 2014
Wal-Mart's Stamping Kit
I knew that Fing'rs had a new stamping set come out with their Heart 2 Art collection last summer but I never got a hold of it. Wandering about Wal-mart last week and lookie what I found! I can't tell for sure yet, but it looks like this set might be getting added to their everyday collection. My Wal-mart is still in the process of setting up the polish wall, but it would be awesome if they carried this all the time! Here is a close up of what comes inside.
For almost 7 dollars you get 2 plates, stamper, scraper, and a tiny bottle of white polish. I didn't care much for the polish, but for a beginner it's fine. I just really prefer my Cosmetic Arts white "Picture Day" right now.
The plates are very nice and this time don't seem to be dupes of any other plate. I whole-heartedly encourage them to come out with original images. All the other plates Fing'rs has come out with have been copies of other plate makers. Interesting thing tho, these plates had no plastic covering on them. Then again, they didn't seem to need it. There were no scratches in the plates at all. They were well etched and rather detailed. The only real problems I've been having is with the "Lucky" image on the right hand plate. Not all the dots in the background want to show up, but I'm gonna keep trying. I have plans for that one for St. Patrick's Day.
Very few white polishes stamp so I wasn't surprised that this white wasn't all that opaque. You can get a stamp from it, it's just not that white. The stamper and scraper I was very pleased with. This is the first scraper I've gotten that I don't mind using. I still prefer my gift card scraper, but this is a very good second best. And the stamper? I love it too! It's about a standard small size, but squishier than all my others. Softer too. Not marshmallow soft like some of the really good expensive stampers, but still nicer than any of my other ones so far.
Over all I am super happy with this set! I recommend it for anyone wanting to learn how to stamp. If you are already comfortable with stamping, just looking for better tools, these are nice, but there are better ones online. For those with epic stamping skills and tools, I wouldn't bother with this set unless you really fall in love with the plates. 7 bucks isn't a bad price for a couple plates and who doesn't need back up stamper and scraper?


